Sending Salesforce Data to Insider
- 21 Mar 2024
- 4 Minutes to read
Sending Salesforce Data to Insider
- Updated on 21 Mar 2024
- 4 Minutes to read
Article Summary
Share feedback
Thanks for sharing your feedback!
Leveraging the Insider and Salesforce integration capabilities, you can easily send the data from Salesforce to Insider and utilize it with Insider’s extensive capabilities.
To enable Insider to authenticate with Salesforce, you must register Insider within Salesforce as your own Connected App to receive OAuth Client ID and Client Secret values.
Your title goes here
You can read here for the official Salesforce documentation on how to create a Connected App.
This integration guide provides a complete frame of:
Use Cases
Using the Salesforce connector enables you to sync the selected data from Leads object, Contacts object, Opportunities object, and Custom objects.
During configuration, you can also set some filters to decide which data should be synced. For example:
- Sync up the leads whose emails do not contain “@yourbrandname.com”
- Assume that you have 150 fields in your Leads object. You can define which fields you want to sync to Insider. So, only the selected data will be sent to Insider.
After having set up the data connection, you can enable such use cases;
- Whenever a lead is collected on Salesforce, the connector will sync that lead and the lead can get into an Architect journey. Within the journey, if the user performs a specific action, such as booking a reservation, Insider can send a personalized SMS to the lead with their reservation details in the SMS.
- Whenever a contact’s loyalty status turns into “Premium” from “Gold” on Salesforce, Insider can send a personalized email informing the contact about the benefits of their new loyalty status.
Field Mapping before Setup
You need to provide mapping for the attributes you would like to get from Salesforce and sync to Insider.
Your title goes here
For the default fields on Salesforce, you do not need to provide the information.
For the fields you want to send as to Insider, you will need field mapping as follows;
- On your Salesforce account, navigate to Setup > Object Manager.

- Choose the label you want to get custom fields from.
- Click Fields & Relationships.
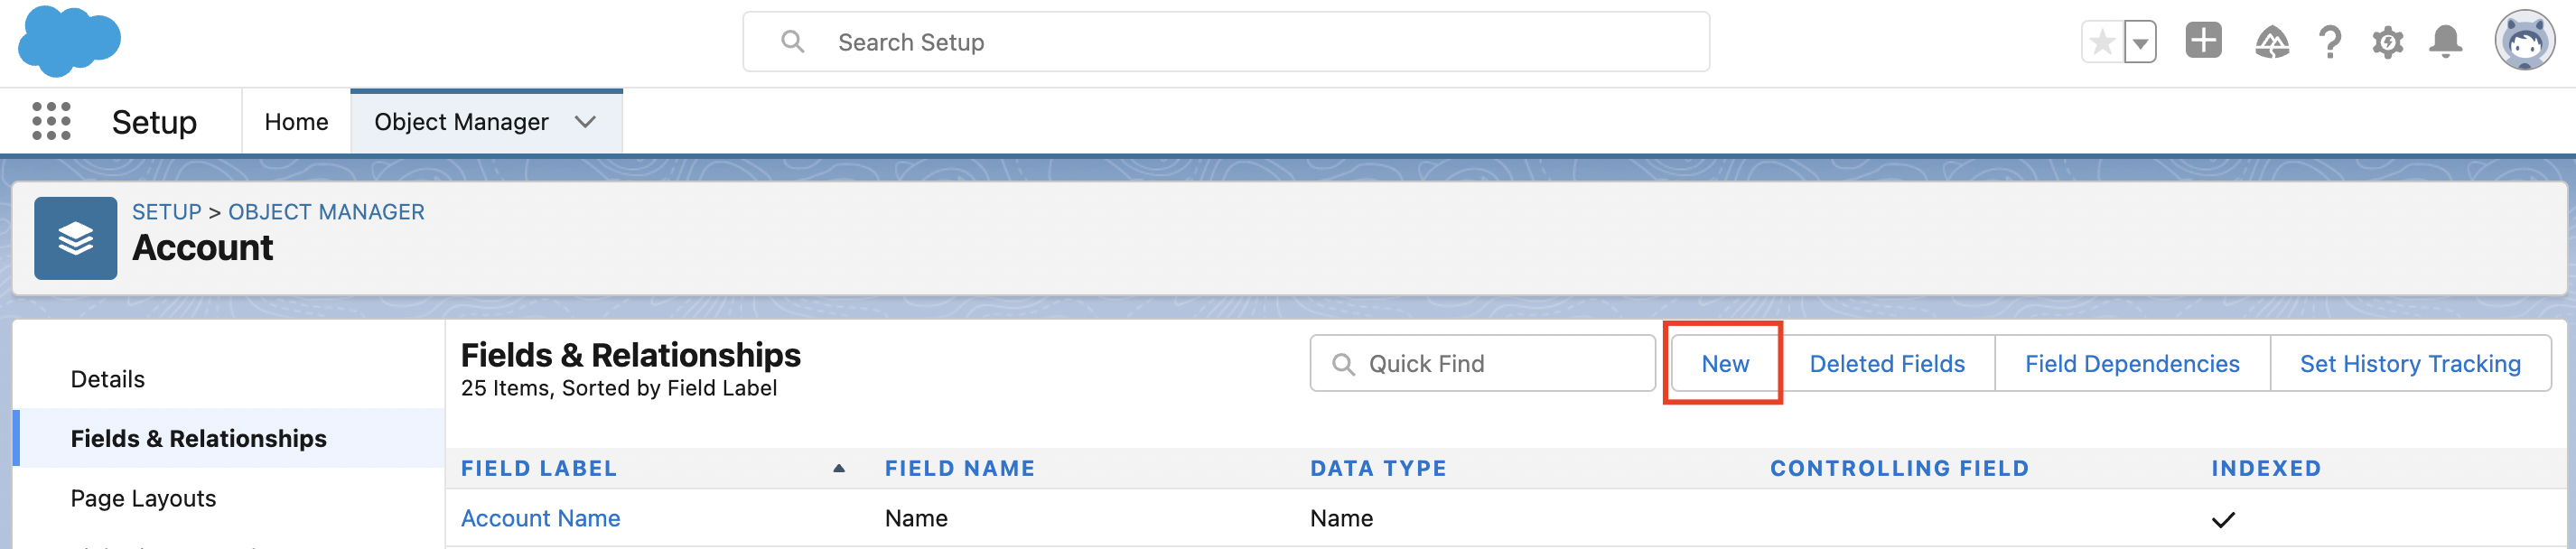
- Provide the value of Field Name for the custom field you want to sync.
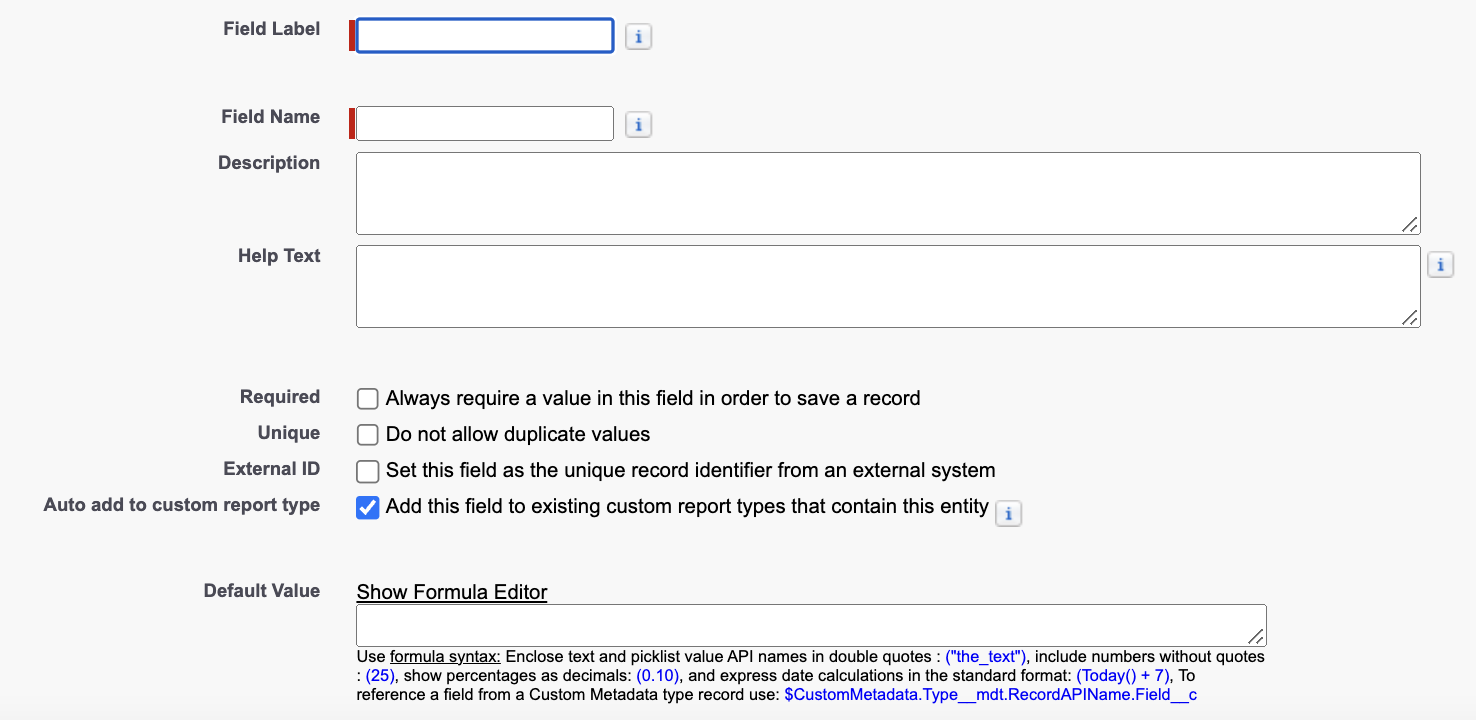
- You should also need to decide on the name of the user attribute on Insider for the corresponding user field.


For example, you can set Field Name as test__c on your Salesforce account while you might want to see the attribute as insider_test at Insider's InOne panel.
Create your App within Salesforce
You can register for a free Salesforce Developer Edition account here or log into your existing Salesforce account if you have one. You can use any Salesforce account to create a Connected App, it doesn’t have to be a Developer Edition account, but we highly suggest you to use a Sandbox account as Connected Apps are destroyed when they are refreshed.
The process of creating an app in Salesforce varies slightly depending upon whether you are using Salesforce Classic, or Lightning Experience.
Salesforce Classic
- Log into your Salesforce account.
- Click Setup in the top right of the screen.
- From the menu on the left, select Build > Create > Apps.
- From the Connected Apps table click New.
Lightning Experience
- Log into your Salesforce account.
- Click Setup in the top right of the screen.
- From the menu on the left, select Platform Tools > Apps > App Manager.
- Click New Connected App.
Basic Information
Whether you are using Salesforce Classic or Lightning Experience when you land on the New Connected App screen, complete the form as follows:
- Connected App Name: Enter a name for your application
- API Name: This will default to the same value as your Connected App Name
- Contact Email: Your email address


API (Enable OAuth Settings)
Mark the Enable OAuth Settings box to display further options.
- Callback URL: You must add a callback URL to allow Salesforce to be used in your Insider Console. The URLs is https://insider.cyclr.com/connector/callback
- Selected OAuth Scopes:You must add the following 2 Scopes to enable Insider to use your App:
- Full access (full)(recommended) or if you know which data you wish to restrict, you can select it from this list.
- Perform requests on your behalf at any time (refresh_token, offline_access)

Save your App configurations. Take notes of your Consumer Key and Consumer Secret values under Manage Consumer Details since you will need to provide this information for Insider's InOne panel.
Your title goes here
It can take up to 10 minutes for any changes to your Connected App to take effect in Salesforce.
Your title goes here
If you try to use your app before you update it, you might encounter this error.

Insider Setup
After your Salesforce App configuration, now set it up within Insider.
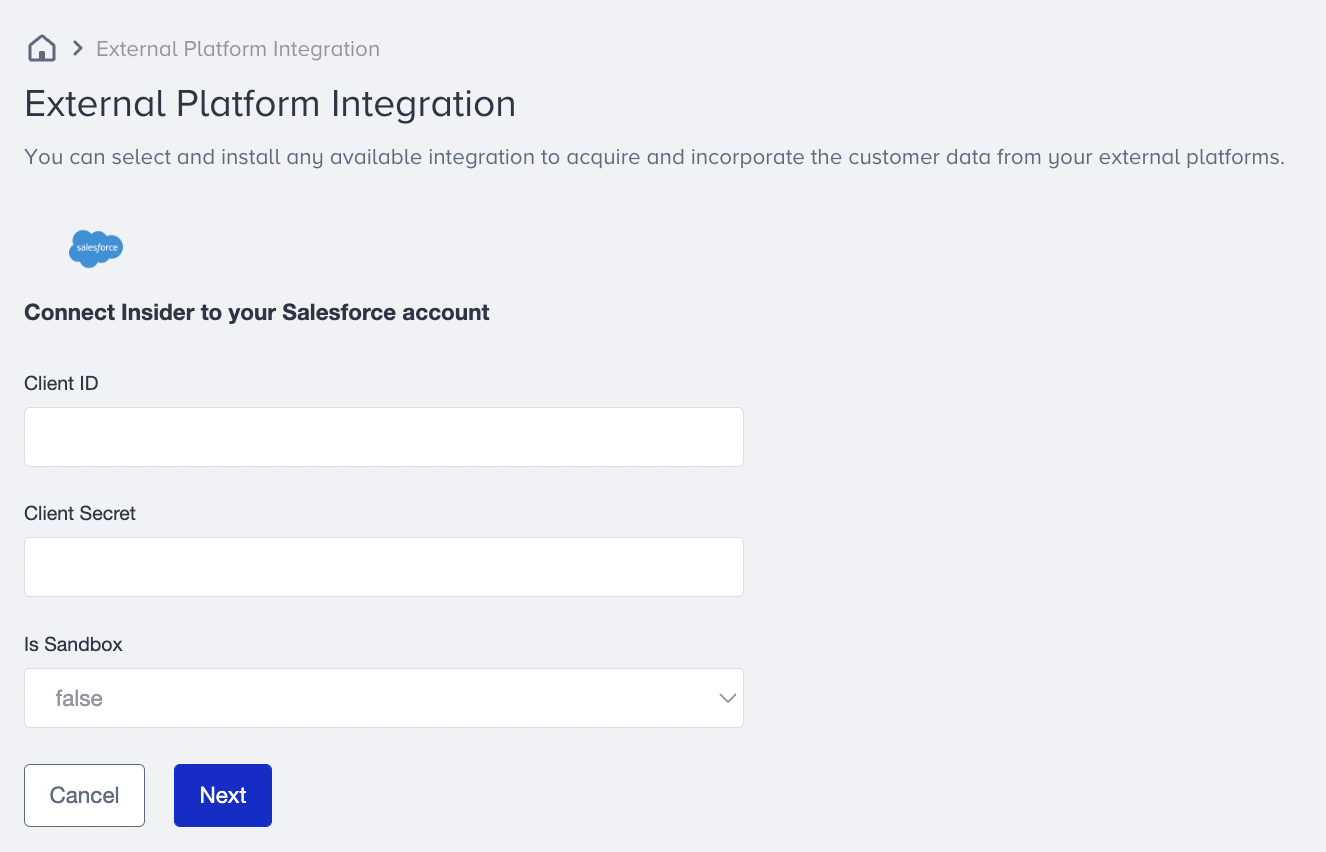
1. Go to Insider's InOne panel and navigate to Components > Integrations > External Platform Integrations.
Your title goes here
If External Platform Integration is not visible on the menu, contact your Customer Success Manager.
2. Click the View button to view methods in the Salesforce category.
3. Choose the method you would like to install.
4. Enter the following values:
- Client ID: the Consumer Key of your Salesforce Connected App.
- Client Secret: the Consumer Secret of your Salesforce Connected App.
- Set Is Sandbox to false.

5. Enter your partner name to the provided field. (Navigate to InOne > InOne Settings > Account Preferences to reach your partner name.)
6. Your Insider API Key will be automatically filled up if you have defined it before.
Your title goes here
To use integrations here, you should have access to Upsert User API. If you haven’t done so, contact Insider team.
7. Click Next and log in to your Salesforce account and finalize the setting. Note that if you are already logged in, this page will not appear.
Was this article helpful?