Email Onboarding Wizard
- 01 May 2024
- 7 Minutes to read
Email Onboarding Wizard
- Updated on 01 May 2024
- 7 Minutes to read
Article Summary
Share feedback
Thanks for sharing your feedback!
Insider's Email Onboarding Wizard helps you effortlessly set up and utilize the Email product for your promotional emails. Before starting to create any email campaigns, you should complete the following steps:
- IP Address Assignment
- Domain and Sender Management
- Global Unsubscribers
- Events and Attributes
- Saved Segments
When you navigate to Experience > Message > Email for the first time, you will see that it is required to set up your account.
(3).png)
Click the Start Setup button to start completing the Onboarding Wizard. The wizard will guide you through the steps until your onboarding flow is complete.
1. IP Address Assignment
On this step, you should enter the expected maximum number of emails you plan to send monthly.
(2).png) This information is required for us to optimize the email delivery process for your account and to match your sending needs effectively.
This information is required for us to optimize the email delivery process for your account and to match your sending needs effectively.
Sharing your expected email volume helps us ensure the best possible email delivery experience for your account. Your emails will reach their intended recipients reliably, promoting engagement and communication success.
Why do we need this information?
Optimal Email Delivery: Your email volume helps us determine the most suitable email infrastructure for your needs.
Shared or Dedicated IP: Based on your expected volume, we will allocate either a shared or dedicated IP address to your Inone account. This IP address will be used for sending out your emails.
Dedicated IP is a static Internet Protocol (IP) that does not change within time. Shared IP is a dynamic Internet Protocol (IP) that is used by multiple senders at the same time. When you utilize a dedicated IP to send email marketing campaigns, you enjoy complete authority over your campaigns and their delivery. Conversely, in the case of a shared IP, multiple users send emails from a shared IP address, as the platform groups senders together for user convenience. The categorization is determined by the email service provider.
Shared IP Address
If your expected email volume is below 3 million of emails per month, then a shared IP address will be assigned. This is suitable for accounts with a consistent and reasonable email volume.
Sharing an IP with others can provide some level of reputation protection, as senders with good sending practices collectively contribute to a positive sender reputation.
Once you enter your monthly volume and submit your request, shared IPs will be assigned to your Inone account immediately. We usually assign 3 to 5 shared IPs to the account to provide a smooth deliverability.(2).png)
(2).png)
Your title goes here
You can also request a dedicated IP address to be assigned to your account. In this case, Insider's Email Deliverability team will contact you to define the number of dedicated IPs for your account's needs. Please note that dedicated IP is a paid service.
Dedicated IP Address
If your expected monthly email volume is higher than 3 million or you require more control over your sender reputation, a dedicated IP address will be assigned.
A dedicated IP can ensure that your sending practices are not influenced by others, and allow you to build your own reputation over time.(2).png)
Once you enter your monthly volume and submit your request, Insider's Email Deliverability team will contact you to define the number of dedicated IPs for your account's needs.
Your title goes here
Monthly volume cannot be manually edited on the panel as it's pre-added to your account based on your signed contract.
2. Domain and Sender Management
On this step, you can seamlessly manage and verify your sender domains for optimal email deliverability and sender reputation.
(2).png)
2.1. Adding Sender Domain
Sender domain helps your recipients identify your emails, and builds trust. Here, you can add your sender domain from which your emails will be sent.
Click the +Add Domain button to enter your sender domain name in the provided field, and submit it. Make sure that your sender domain is unique and has never been registered before. Otherwise, it might affect your email deliverability. You can create a new sub-domain to your domain.

Once you click the Submit button, we check whether your domain is unique or already in use. If it is used anywhere else, we require you to enter a different domain to continue.(1).png)
Only users with Collaborate, Edit & Publish, or Manage Users access can submit a domain. If you do not have the necessary access, you should upgrade your access.

2.2. Verifying Sender Domain
Once you add your sender domain, the next step is to add domain records into your DNS configuration and verify it.
Until this step is completed, your domains' verification status will be Pending.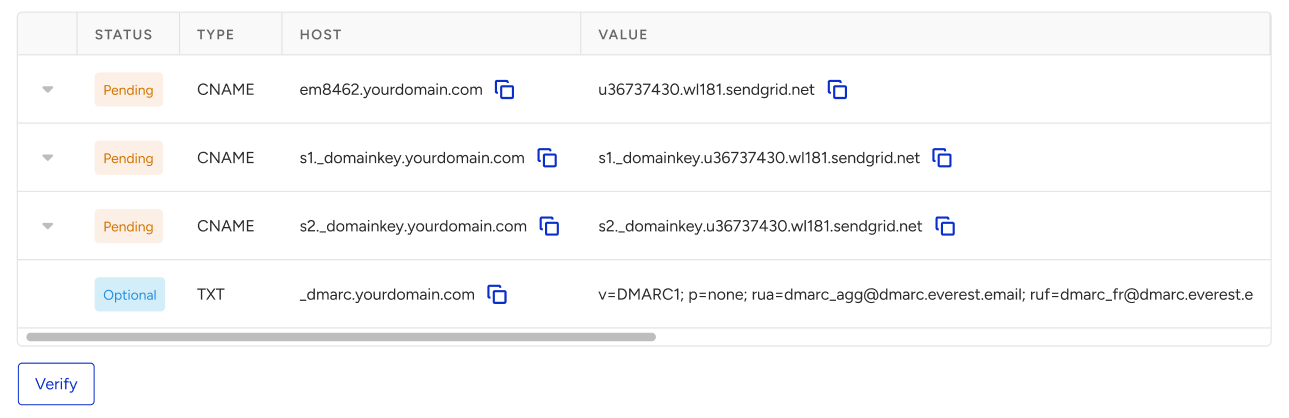
Adding a CNAME (Canonical Name) record to your DNS configuration is to redirect from one domain or subdomain to another. These records help establish your ownership of the sender domain and enhance email deliverability.
To do your DNS configuration, you can refer to Configuring DNS Settings or follow the steps below:
1. Log in to Your DNS Provider's Dashboard
Log in to the dashboard or control panel of your DNS hosting provider. This is where you manage your domain's DNS settings.
2. Locate DNS Records
Navigate to the section where you manage DNS records. This is often referred to as "DNS Management", "DNS Settings", or "DNS Records".
3. Create a New DNS Record
Find the option to add a new DNS record. It might be labelled "Add Record" or "Create Record".
4. Add CNAME Records
Choose the record type CNAME. Copy the Host value from the DNS RECORDS table in Inone as displayed in the example above (e.g. s1._domainkey.yourdomain.com), and paste it into the Name or Host field in the DNS settings.
Copy the Value record from the DNS RECORDS table in Inone, and paste it into the Points To or Value field in DNS settings (e.g. u21398234.wl.sendgrid.net).
5. Add DMARC Record
As of February 2024, DMARC record will be mandatory required by Gmail and Yahoo. We recommend adding a DMARC (Domain-based Message Authentication, Reporting, and Conformance) record to your DNS configuration as an important step to enhance email security and prevent email spoofing. DMARC helps recipients' email servers determine whether incoming emails from your domain are legitimate.
Once your DMARC record is active, we will receive email reports about email authentication and delivery. These reports provide insights into the sources of email sending on behalf of your domain.
To add a DMARC record to your DNS configuration:
#1 Choose the record type TXT, copy the Host value from the DNS RECORDS table in Inone, and paste it into the Name or Host field in DNS settings (e.g. _dmarc.yourdomain.com, replace yourdomain.com with your actual domain).
#2 Add this record into the Points To or Value field in DNS settings: v=DMARC1; p=none; rua=dmarc_agg@dmarc.everest.email; ruf=dmarc_fr@dmarc.everest.email; fo=1; pct=100; rf=afrf.
If you have your own email deliverability monitoring system you can add it instead.
6. Save the Records
After adding all the CNAME records, save the settings. It might take some time for the changes to propagate globally across the DNS network, so it's possible that the changes will not take effect immediately. Make sure to double-check your records after implementation to ensure they are correctly configured.
7. Verify the CNAME Records
After the DNS records are propagated, you can verify its existence using the Verify button in the Inone Domain Management page to confirm if your CNAME record has been added correctly.
Your title goes here
If you're unsure about how to add DNS records, you can consult with your IT or DNS administrator for guidance.
If you receive Failed status while verifying your domain, it means your DNS records are not added, added incorrectly, or still not propagated.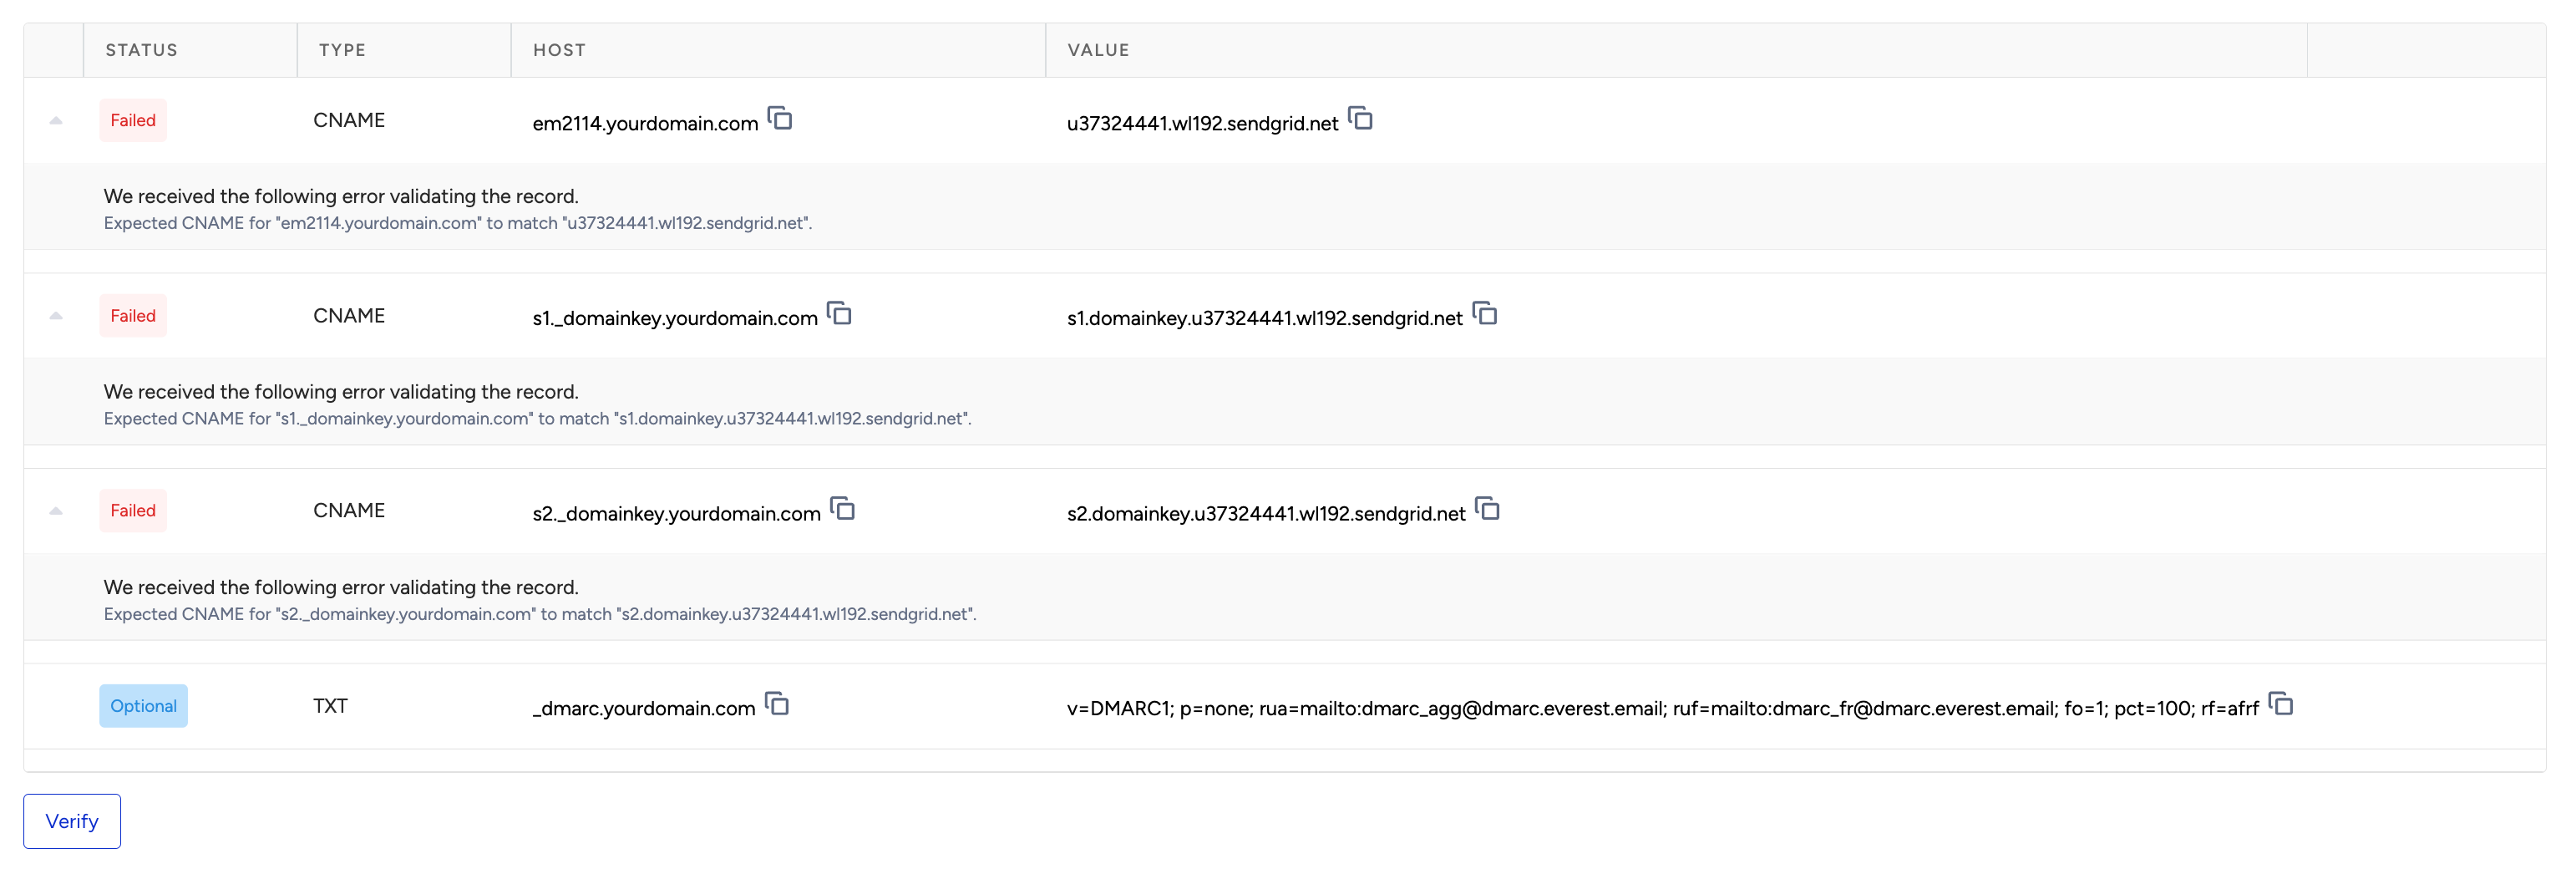
Once your domain is verified successfully you can proceed to adding sender addresses.
2.3. Add Sender Addresses
1. Go to the menu next to your sender domain, and click to Add Sender Addresses.
(1).png) 2. Give your sender address a name that your recipients will see in From, and the username, which is first part of the email address you will use to send emails from.
2. Give your sender address a name that your recipients will see in From, and the username, which is first part of the email address you will use to send emails from.(1).png)
Default Sender Address
After adding a sender address, you can make it a default sender from the menu. Default sender address will be selected automatically for every new email campaign once created.
You can also delete a sender address from the menu. Note that you cannot delete a default sender address, so you need to make another sender address as default in order to delete it.(1).png)
Click the Save and Continue button once you complete adding a new sender address.
3. Global Unsubscribers
On this step, you can manage your unsubscribe lists. You can import the list if you have one, or add it manually. You can also skip this step, and complete it later. For further information, refer to Managing Email Suppressions.
4. Events and Attributes
This step is optional, but recommended. On this step, you can create events and attributes. You can also skip this step, and complete it later.
(1).png)
Events and attributes help you track email engagement and interactions, collect valuable data to personalize future campaigns, and gain insights to optimize your email strategy.
5. Saved Segments
This step is optional, but recommended. You can create and save segments for targeted campaigns. You can tailor your content to specific audiences for improved results, enhance engagement and conversion rates. For further information, refer to Saved Segments.
Completing Step 1 and 2 is essential to begin using the Email product. While Steps 3 to 5 are optional, we strongly recommend their completion for a comprehensive and effective email experience.
Once you complete all the steps, you can move forward with using Email.
(2).png)
Was this article helpful?